Palau Digital Residency Photo Requirements
A practical checklist for the Palau digital residency photo upload, including size, background, expression, eyeglasses, and rejection risks.
We may earn a commission if you apply through this link. This site is independent and is not the official RNS.ID or Palau government site.
The short answer
The Palau digital residency photo requirements are stricter than a casual profile photo. RNS says the application needs a square color photo for the new ID, exactly 600x600 pixels or larger, with a plain white or off-white background, no filters, no eyeglasses, and a clear full-face view.
If your photo is cropped poorly, blurry, edited, scanned from another document, or not square, it can slow down the application. The safest approach is to prepare the photo before starting the RNS.ID form, then compare it against the official RNS photo requirements before payment.

What RNS asks for
RNS lists the photo rules in its official support documentation. The practical version is:
| Requirement | What it means in plain English |
|---|---|
| Square image | Use a 1:1 crop, not portrait or landscape |
| 600x600 pixels or larger | Do not upload a tiny or compressed image |
| Recent color photo | RNS says photos should be taken within the last 6 months |
| Plain background | Use white or off-white, not a room, curtain, or patterned wall |
| No filters or digital changes | Avoid social filters, retouching, AI edits, or heavy color changes |
| No eyeglasses | Remove glasses even if you normally wear them |
| Face camera directly | Keep the full face visible with both eyes open |
| Neutral expression or natural smile | Avoid exaggerated expressions |
The important pattern is simple: RNS wants an ID-card photo, not a social profile image.
Official screenshot from RNS photo documentation
The screenshot below was captured from the RNS photo requirements page with Jina and saved locally so readers can verify the rule set without relying on a temporary screenshot URL.
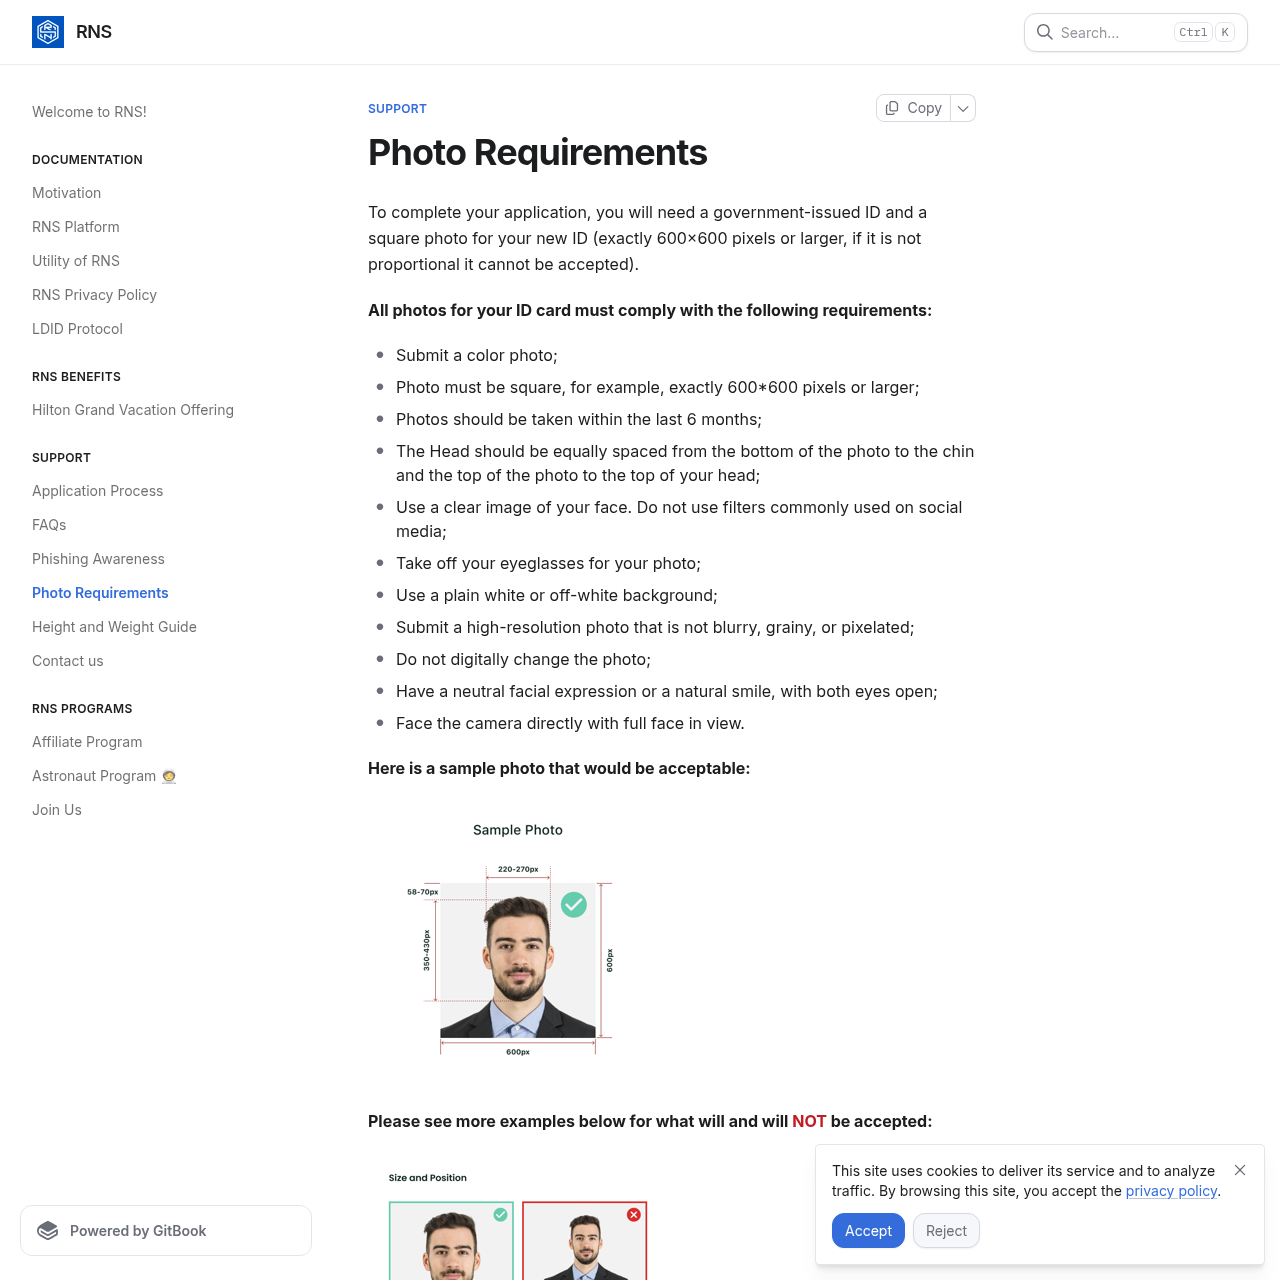
Photo mistakes that cause delays
Most photo problems are avoidable. Before uploading, check for these issues:
| Mistake | Why it matters |
|---|---|
| Cropping too close | RNS expects the head to be proportioned correctly inside the frame |
| Using a passport scan | The application asks for a photo, not a scanned ID document |
| Wearing glasses | RNS specifically says to take off eyeglasses |
| Using a selfie with a busy background | The background should be plain white or off-white |
| Uploading a filtered phone photo | RNS says not to use commonly used social-media filters |
| Submitting a blurry image | The photo should be high-resolution and not blurry, grainy, or pixelated |
If you already had a photo rejected, read Palau ID photo rejected: what to fix. That page focuses on rejection recovery, while this page focuses on getting the upload right before submission.
How to prepare the photo before applying
Use a simple workflow:
- Take a new color photo against a plain white or off-white wall.
- Face the camera directly with your full face in view.
- Remove eyeglasses and avoid hats or anything that hides the face.
- Crop the image as a square.
- Export it at 600x600 pixels or larger.
- Check that the image is sharp and has not been filtered or retouched.
- Keep the original file in case RNS support asks for another version.
This is also a good time to prepare the rest of your application file. Use the Palau digital residency documents checklist before starting, then follow the how to apply for Palau digital residency guide.
What if the rest of the application is fine?
A strong photo does not guarantee approval. RNS still reviews identity documents, eligibility, and the application record. RNS also controls the official account, payment, and review process. This independent affiliate site cannot access your RNS account or change application decisions.
If the application is declined for reasons beyond the photo, use Palau digital residency application rejected to separate photo problems from document, eligibility, payment, and support issues.
Quick pre-submit checklist
- Is the photo square?
- Is it at least 600x600 pixels?
- Is the background white or off-white?
- Are eyeglasses removed?
- Is the full face visible?
- Are both eyes open?
- Is the file sharp?
- Is the image free of filters and digital changes?
If every answer is yes, your photo is closer to the official RNS standard. If one answer is no, fix it before submitting.
Bottom line
The best Palau digital residency photo is boring: square, clear, recent, unfiltered, full-face, and shot against a plain light background. That is exactly the point. RNS is producing a government-linked identity card, so the photo should look like an ID-card photo from the start.
For the full application sequence, start with Palau e-residency apply online, then review Palau digital residency timeline so you understand what happens after submission.